Optimize Canvas for your Secondary Classroom
It’s time to take your digital classroom to the next level. We’ve collected the best practices for setting up your Learning Management System (LMS) with Canvas that promote greater student independence and content mastery.
Why Canvas?

Canvas is a web-based learning management system that allows educators and students access to blended, self-paced, mastery-based learning.
Educators may find the following features useful to meet the needs of their students:
Ability to differentiate learning activities through Mastery Paths
Embedding frequently used resources such as the progress tracker and instructional videos to limit navigation away from Canvas
Create multiple versions of Mastery Checks through Question Banks
Many districts purchase Canvas for their educators and you may have access to more features than are listed here. Canvas is also available for free for educators.
Tip #1: Simplify the Student Experience
Limiting the number of clicks students need to make to find their learning materials is key to making Canvas accessible. Fewer places to navigate means fewer opportunities to complete work out of sequence!

In settings, create a custom navigation bar link to websites that students will frequently access in your course.
Create a Welcome Page with buttons for easy navigation to current units.
Create a resource module where students can access their tracker, additional learning resources, and office hour information.
Tip #2: Create Mastery Paths for Differentiation

Mastery Paths offer students a differentiated learning experience. Using Mastery Paths, students take a pre-assessment, which will determine what work or path they will follow in the module.
To turn on this feature, go to Settings and scroll to Feature Options.
Note: This may need be turned on by your administrator.
Mastery Path defaults to three different paths, but you can always make two paths identical if you only want two different mastery paths.
Create a module that contains all the possible assignments for all paths.
Example: Cold War
Educators create a pre-assessment that covers the Cold War content that will be taught. Based on a student’s score, they will have certain lessons that open up to them.
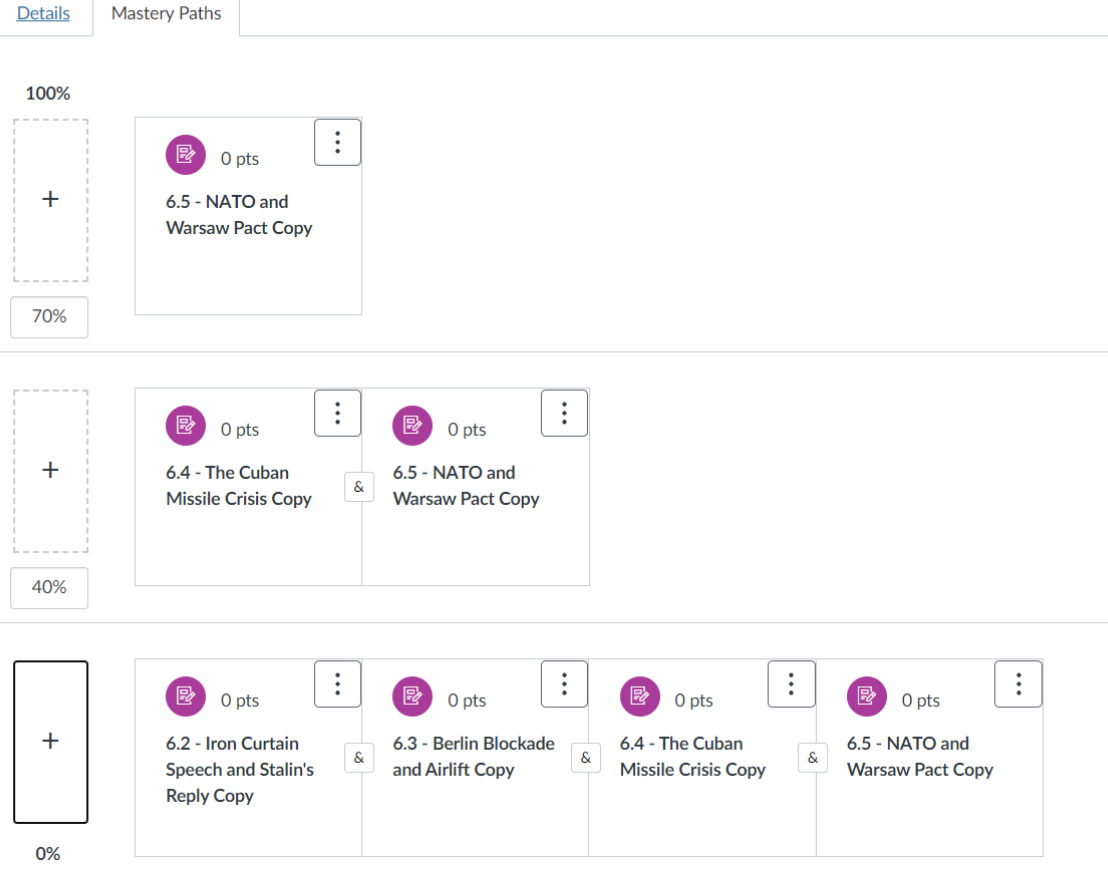
The first row illustrates the learning path for students who score 70% or higher on the pre-assessment.
The second row shows the learning path for students who score in the 40%-69% range.
The last row shows the learning path for students who score in the 0-39% range.
Example: Interest Quiz
Educator creates a quiz that asks students about their reading interests. Based on a student’s responses, they will have certain books and lessons opened up to them in their assignments.
Create a simple quiz with one question.
Set the Mastery Paths so everyone who selects “Ocean” will receive a 100% on the quiz, and will get the “Ocean” reading.
Set the bottom path (students who receive a 0%) to see the “Jungle” reading.
Tip #3: Utilize Question Banks
Question Banks are a great way to quickly create multiple versions of a Mastery Check.
Having multiple versions allows for easy reassessment and limits the ability for students to copy their peers.
You can also add question banks across for use in other quizzes or courses.
Click on Quizzes, and click on the three dots at the top right hand corner to access “Manage Question Banks.”
Create a Question Bank for specific units by adding all the questions learners should be able to master.
Create a new assessment, and select “Find Questions” to add how many questions from the Question Bank you would like to appear each time a student attempts a Mastery Check.
Tip #4: Embed Frequently Used Resources
Embedding resources limits how often students navigate away from Canvas by decreasing the number of external links students need to access.
Embedding the tracker can support students and caregivers with monitoring their progress as they access their learning activities in Canvas.
Embed other resources like EdPuzzle videos or daily SEL surveys or Google Slides.
This slide has books and other items students can click on!
Tip #5: Integrate with Popular Apps
Canvas allows for a variety of apps to be integrated into the LMS, including many free apps. Whether you are a Google or Microsoft school, there are ways to integrate and streamline assignments and grading.
Google Assignments LTI
Streamlines assignment distribution
Grade with Canvas SpeedGrader or Google Assignments
Educators can see student progress on Google Assignments
Ensure educators and students only use school-issued accounts
Read more and watch a video about Canvas + Google Assignments LTI.
Microsoft Office 365
Use single sign-on technology to log in to Canvas
Create documents in Office 365 and submit them as Assignments
Grade with SpeedGrader
Link to Office 365 docs in the Canvas Rich Content Editor
Push assignments and grades directly from the OneNote Class Notebook to Canvas
Read more and watch a video about Canvas + Microsoft Office 365 Integration.
Next Steps in Canvas
As you begin using Canvas with your learners, remember that Canvas can do many things. Don’t feel like you have to use all of the features, especially to start. Your learners will benefit from a simple, easy to navigate LMS. You can always add more later! See below for how you might start.
Must Do
✓ Create your Canvas course or log into your district provided Canvas homepage.
✓ Edit the layout of your homepage to meet the needs of your learners.
✓ Create a course that is easy to navigate and well-organized, and teach your students how to use it.
Should Do
✓ Explore the free Canvas Training opportunities to deepen your understanding and find new ways to use Canvas.
✓ Embed your progress tracker into a page, linking assignments to the tracker where possible.
Aspire to Do
✓ Collaborate with colleagues to share ideas for Canvas best practices.
✓ Try using outcomes to track mastery within your course by using the Learning Mastery Gradebook.